
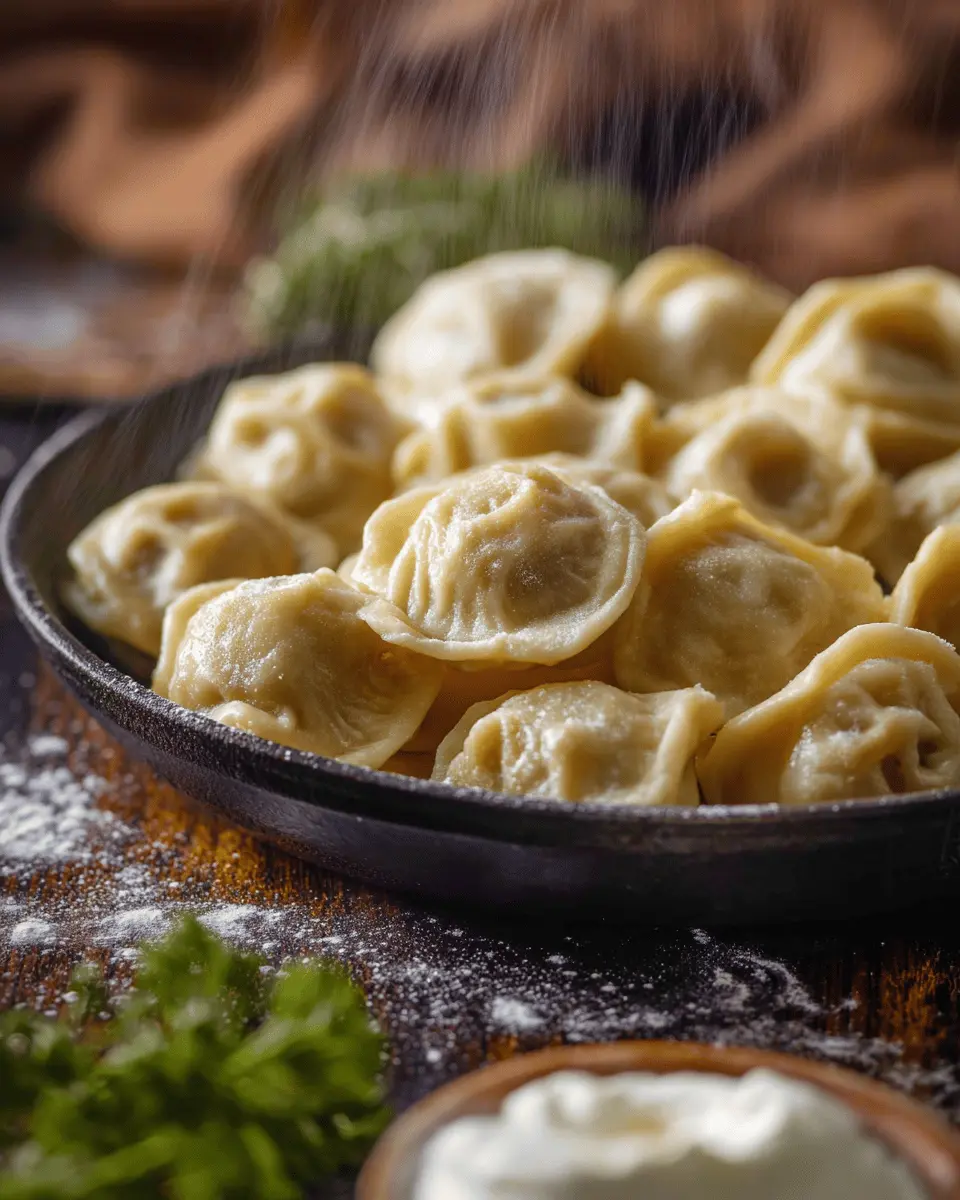
Introduction to Russian Pelmeni
If you’re looking to elevate your homemade meals, then Russian Pelmeni should definitely be on your culinary radar. These delightful meat dumplings are not only comforting but also incredibly versatile, making them the ultimate dish for any occasion. Traditionally enjoyed during the cold months, pelmeni carry a rich history that connects families and communities across Russia, as they are often made in large batches for gatherings.
Why Russian Pelmeni is the Ultimate Homemade Delight?
One of the best things about Russian pelmeni is the ability to customize the filling to suit your taste. Whether you prefer ground beef, chicken, or even a mix of meats, the flavor profiles can be adjusted with herbs and spices, offering infinite variations. Did you know that pelmeni can also be frozen for quick meals later? This makes them a perfect choice for busy young professionals looking for a hearty, homemade bite without the fuss.
Moreover, the process of making pelmeni can be a fun group activity. Get your friends or family involved, and you’ll not only create delicious food but also build lasting memories. Pair these dumplings with a dollop of sour cream or a sprinkle of butter, and you’ll have a comforting meal that feels like a warm hug on a plate. Dive into this culinary adventure and discover why Russian pelmeni are cherished by so many!
Ingredients for Russian Pelmeni
Essential ingredients for the dough
To create the perfect dough for your Russian Pelmeni, you’ll need just a few staple ingredients that come together seamlessly:
- 3 cups of flour – Opt for all-purpose flour for the right texture.
- ⅔ cup of lukewarm water – This helps to activate the gluten, making the dough more pliable.
- 3 eggs – Eggs add richness and stability to the dough.
- 1 teaspoon of salt – A key ingredient to enhance flavor in the dough.
Ingredients for the filling
For the filling, you want a flavorful combination that reflects the hearty nature of pelmeni. Here’s what you need:
- 2 lb of ground meat – You can use beef, chicken, or turkey, depending on your preference.
- 1 large onion – Grated finely, it adds moisture and flavor.
- ½ tablespoon of salt – Adjust this to your taste.
- 1 teaspoon of pepper – This gives a nice kick!
Must-have serving options
When it comes to serving your delicious Russian Pelmeni, you'll want to keep things simple yet satisfying:
- Sour cream – A classic choice that complements the dumplings perfectly!
- Unsalted butter – Drizzling some over hot dumplings enhances their flavor without overwhelming it.
Consider trying out these ingredients and serving options to create an authentic taste of Russia right in your kitchen!
Preparing Russian Pelmeni
Making Russian pelmeni at home might seem like a daunting task, but with the right guidance, you'll be whipping up a batch in no time. These delightful dumplings are not only a comfort food but also a fun cooking project you can share with friends or family.
Making the dough from scratch
The foundation of your pelmeni is the dough. For a delightful dumpling, you’ll need:
- 3 cups of flour
- ⅔ cup of lukewarm water
- 3 eggs
- 1 teaspoon of salt
Start by sifting the flour and salt into a large mixing bowl. Incorporate the eggs, mixing until well-combined, then slowly add the lukewarm water. If you're feeling ambitious, consider using a stand mixer to create a smooth dough. Ensure the surface is generously floured when you’re ready to knead. After a few minutes of kneading, let your dough rest for 20 minutes under a towel. This step is crucial as it relaxes the gluten, resulting in a softer texture.
For more tips on perfect dough, check out Serious Eats' guide.
Preparing the filling
The filling can truly make or break your Russian pelmeni. Most commonly, a blend of meats is used. For a delicious filling, gather:
- 2 lbs of ground meat (consider beef for a classic taste)
- 1 large grated onion
- ½ tablespoon of salt (to taste)
- 1 teaspoon of pepper (to taste)
In a large bowl, mix these ingredients together using your hands until they’re thoroughly combined. If you want to add some flavor, consider incorporating spices like garlic powder or fresh herbs. The key is to achieve a balanced flavor that complements the dough.
Shaping the pelmeni: Mold vs. by hand
When it comes to shaping your pelmeni, you have two popular options. Using a mold is a great time-saver! Roll out your dough, place it over the floured mold, fill each cavity with your meat mixture, and cover with another sheet of dough. Roll over it with a rolling pin to separate the dumplings easily.
Conversely, if you prefer a more hands-on approach, rolling the dough out manually and cutting it into circles with a cookie cutter achieves charming results. Place a small amount of filling on each circle, fold it over, and pinch the edges tightly. You can even join the corners, creating a lovely little design. It adds a personal touch!
Cooking the pelmeni to perfection
Once your pelmeni are rolled and filled, it’s time to cook them. Boil a large pot of salted water and drop them in, cooking until they float — about 5-7 minutes.
To enhance the flavor, consider skimming the water and adding a bit of butter, or serve them with sour cream, which contrasts beautifully with the savory filling. If you want to store some for later, freeze them before cooking for a quick meal option anytime.
So, grab your ingredients, rally your friends or family, and let’s create some delicious pelmeni together! No kitchen should miss out on these delightful dumplings.

Variations on Russian Pelmeni
Vegetarian Pelmeni Options
If you’re looking to make your Russian pelmeni a bit lighter, consider vegetarian fillings. Popular choices include an earthy mix of mushrooms and sautéed onions, or a fresh spinach and ricotta combo. You can also experiment with mashed potatoes and herbs for a hearty taste that's pure comfort food. For more tips on crafting delicious vegetarian dumplings, check out Wellness Mama's guide on plant-based fillings!
Creative Filling Combinations
Don’t be afraid to get inventive with your fillings. Think outside the traditional beef! Try turkey bacon or chicken ham paired with spiced feta for a Mediterranean twist, or mix in shredded carrots and cabbage for a touch of crunch. If you like a bit of heat, jalapeños and cream cheese could elevate your pelmeni to new flavor heights! Explore diverse fillings to create a dumpling platter that’s just as vibrant as it is delicious.
Cooking tips and notes for Russian Pelmeni
Common mistakes to avoid
When making Russian pelmeni, one of the most common pitfalls is overworking the dough. By mixing too much, you can end up with tough pellets instead of tender dumplings. Also, avoid using too much filling or skimping on seasoning, as this will lead to bland results. Lastly, remember to boil pelmeni in plenty of salted water – this enhances flavor and prevents them from sticking together.
Tips for achieving the perfect texture
For perfectly textured Russian pelmeni, ensure your dough is soft but not sticky. A rested dough works wonders, so let it sit covered for about 30 minutes. When boiling, cook the dumplings until they float and give them an extra 1-2 minutes to ensure the meat is fully cooked. Remember, serving them with a rich sauce or a dollop of sour cream can elevate the overall dining experience!

Serving suggestions for Russian Pelmeni
Traditional accompaniments
When enjoying Russian pelmeni, the classics never disappoint. Serve these delightful dumplings with a generous dollop of sour cream for that creamy contrast, or simply drizzle them with unsalted butter for a rich finish. For an extra kick, sprinkle some fresh herbs like dill or parsley. The combination of flavors will take your meal to the next level, just as they do in Russian homes during the cold months.
Creative serving ideas
Feeling adventurous? Consider pairing Russian pelmeni with a tangy tomato sauce or a spicy mustard for an unexpected twist. You can also try serving them on a bed of sautéed spinach or alongside a fresh salad for a vibrant, nutritious meal. If you're hosting friends, plate them as party bites with toothpicks and a variety of dipping sauces, turning your dinner into a fun culinary experience!
For more inspiration, check out this guide on traditional Russian dishes to explore flavors that pair beautifully with pelmeni!
Time Details for Russian Pelmeni
Preparation Time
Get ready to roll! The preparation for Russian Pelmeni takes about 1 hour. This includes making the dough and preparing the meat filling — a perfect time to breeze through your kitchen playlist.
Cooking Time
Once you've assembled your dumplings, they're ready to hit the boiling water. Cooking takes about 20 minutes. Keep an eye on them and watch as they float to the surface, a delightful indicator that they’re done!
Total Time
From start to finish, expect a total of 1 hour and 20 minutes for this tasty meal. With just a bit of patience, you’ll be savoring warm, homemade pelmeni in no time!
Want to dive deeper into the origins of pelmeni? Check out this article that explores their fascinating history!
Nutritional Information for Russian Pelmeni
Understanding the nutritional value of your meals can help guide your eating choices. Here’s a quick glance at Russian Pelmeni.
Calories per Serving
A serving of Russian Pelmeni contains approximately 250 calories, perfect for a warming meal without overindulging.
Protein Content
Each serving packs in a robust 14 grams of protein, offering a great source of essential amino acids to keep you energized.
Sodium Levels
Being mindful of sodium, these tasty dumplings contain about 500 mg of sodium per serving, which can be balanced with low-sodium dip options, like yogurt or fresh herbs.
If you're keen to dive deeper into healthy dumpling options, check out the American Heart Association for tips on sodium and nutrition.
FAQs about Russian Pelmeni
How do I freeze pelmeni for later use?
Freezing Russian pelmeni is a great way to have a quick meal on hand! After shaping the dumplings, arrange them in a single layer on a baking sheet and pop them in the freezer until firm—this prevents them from sticking together. Once frozen, transfer them to a freezer-safe bag, making sure to label it with the date. They can stay good for up to three months. When you’re ready to enjoy them, simply boil or steam straight from the freezer!
What's the best way to reheat pelmeni?
Reheating pelmeni is all about preserving that lovely texture. You can boil them in water for a few minutes or steam them until heated through. If you prefer a crispy texture, try pan-frying them in a bit of butter for a delightful crunch. Serve them with a dollop of sour cream or your favorite sauce for an extra taste boost.
Can I make pelmeni in advance?
Absolutely! Making Russian pelmeni in advance is a time-saver. You can either freeze them before cooking or store them in the fridge for a couple of days. Just ensure they’re well-sealed to maintain their freshness. Whether you're prepping for a dinner party or a cozy night in, having pre-made pelmeni will simplify your plans!
Conclusion on Russian Pelmeni
Russian pelmeni provide a cozy, comforting meal perfect for any occasion. Whether you serve them with sour cream or a drizzle of unsalted butter, these delightful dumplings are sure to impress family and friends. Try them for a taste of authentic Russian cuisine! Explore similar dishes to expand your culinary repertoire.

Russian Pelmeni (Meat Dumplings)
Equipment
- Stand Mixer
- pelmeni mold
- rolling pin
Ingredients
Pelmeni Dough
- 3 cups flour
- ⅔ cup lukewarm water
- 3 large eggs
- 1 teaspoon salt
Pelmeni Filling
- 2 lbs ground meat pork, chicken, turkey, or ground beef
- 1 large onion grated
- ½ tablespoon salt to taste
- 1 teaspoon pepper to taste
Serving Pelmeni
- sour cream
- Unsalted Butter
Instructions
Pelmeni Dough
- Sift the flour and salt into a large mixing bowl. Add the eggs and mix until incorporated. Add water.
- Using a stand mixer, mix the dough until smooth. Sprinkle flour onto a flat work surface.
Pelmeni Filling
- In a large bowl, mix the ground meat, grated onion, salt, and pepper with your hands until well-combined.
Assemble the Pelmeni
- To save time, use a pelmeni mold to shape the dumplings. To do so, roll out a flat piece of dough and place it on the well-floured mold. Fill each hole with meat.
- Make another flat, round piece of dough and place it on top. Sprinkle with flour and use a rolling pin to roll over the dough until each dumpling is separated.
- Flip the mold over and shake out the pelmeni. Dust them with flour. At this point, you can either freeze them for later or boil them to eat immediately.
- Alternatively, you can make the pelmeni by hand. To do so, roll the dough out and cut small circles out of it using a cookie cutter. Place the meat mixture in the middle and fold over the sides into a half-moon shape, pinching the edges together to secure the filling inside. Connect the two corners together. Repeat until you have no dough or meat mixture left.


Leave a Reply