
Introduction to Spicy Tuna Onigiri
If you're on a culinary journey and craving something unique, Spicy Tuna Onigiri might just be your new favorite dish! These Japanese rice balls elevate your snacking game with a delicious blend of seasoned sushi rice and a spicy mayo tuna filling. But why go through the effort of making them at home?
Why make Spicy Tuna Onigiri at home?
Making Spicy Tuna Onigiri at home comes with countless benefits. First off, the freshness of homemade food can't be beaten. By preparing them yourself, you have complete control over the ingredients, ensuring that everything is high quality and tailored to your taste. Plus, you can adjust the spice level of the tuna filling according to your preference, whether you want a mild flavor or a fiery kick.
Another great reason is convenience! These little rice balls are perfect for picnics, road trips, or even a quick snack at your desk. They’re easy to pack and make for a satisfying meal on the go. What’s more, they can be made with or without a mold, making them accessible no matter your kitchen setup. Ready to roll up your sleeves? Grab your ingredients, and let’s dive into making these tasty treats! Don't forget to check out our how-to section for step-by-step instructions!
Ingredients for Spicy Tuna Onigiri
Essential ingredients for the rice
To create the perfect base for your Spicy Tuna Onigiri, you'll need 4 cups of hot, freshly cooked sushi rice or medium-grain rice. The seasoning is key, so don't forget to mix in 1 tablespoon of rice vinegar, 1 teaspoon of granulated sugar, and ½ teaspoon of fine salt. For an extra burst of flavor, consider adding 2 tablespoons of furikake, a delightful Japanese rice seasoning that elevates the taste.
Key components for the spicy mayo tuna
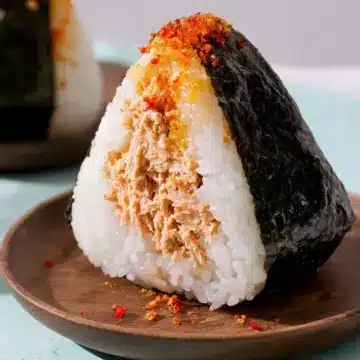
The star of your Spicy Tuna Onigiri is the filling! You'll require 4 ounces of light canned tuna (usually one regular can), well-drained to keep your mixture from getting soggy. Combine the tuna with 1½ tablespoons of Kewpie mayo and 1 tablespoon of Sriracha. Adjust the Sriracha to your taste for that perfect level of spice!
Recommended tools and equipment
Getting organized? Here are a few tools to make your onigiri-making journey smoother:
- Rice Cooker: Achieve perfectly cooked sushi rice every time.
- Mixing Bowl: For combining your spicy mayo tuna.
- Measuring Spoons: Accurate measurements make a world of difference.
- Onigiri Mold: Having this handy will help shape your rice balls beautifully (if you choose that method).
With these ingredients and tools, you'll be well on your way to creating mouth-watering Spicy Tuna Onigiri that your friends and family will love!
Preparing Spicy Tuna Onigiri
Creating delicious spicy tuna onigiri is a fantastic kitchen adventure. They are not only tasty but also incredibly customizable—perfect for lunchboxes, snacks, or entertaining. Here’s how to prepare them in a few easy steps.
Prepare the sushi rice
Start by cooking about 4 cups of sushi rice or medium-grain rice according to the package instructions. Once your rice is fluffy and hot, it’s time to season it. In a small bowl, mix 1 tablespoon of rice vinegar, 1 teaspoon of granulated sugar, and ½ teaspoon of salt until the sugar dissolves. Pour this mixture over the hot rice, fluffing it gently to evenly distribute the seasoning. This step is crucial because seasoned rice offers a delightful flavor that pairs perfectly with the spicy tuna filling. To keep your rice from drying out while you work on other elements, cover it with a damp towel.
Make the spicy mayonnaise tuna filling
While the rice is cooling, let’s whip up the tuna filling! Grab a mixing bowl and add 4 ounces of well-drained light canned tuna, 1½ tablespoons of Kewpie mayo, and 1 tablespoon of Sriracha (or adjust to match your spice preference). Mix everything until it’s well combined. The result should be a creamy, spicy filling that contrasts beautifully with the seasoned rice.
Forming onigiri with a mold
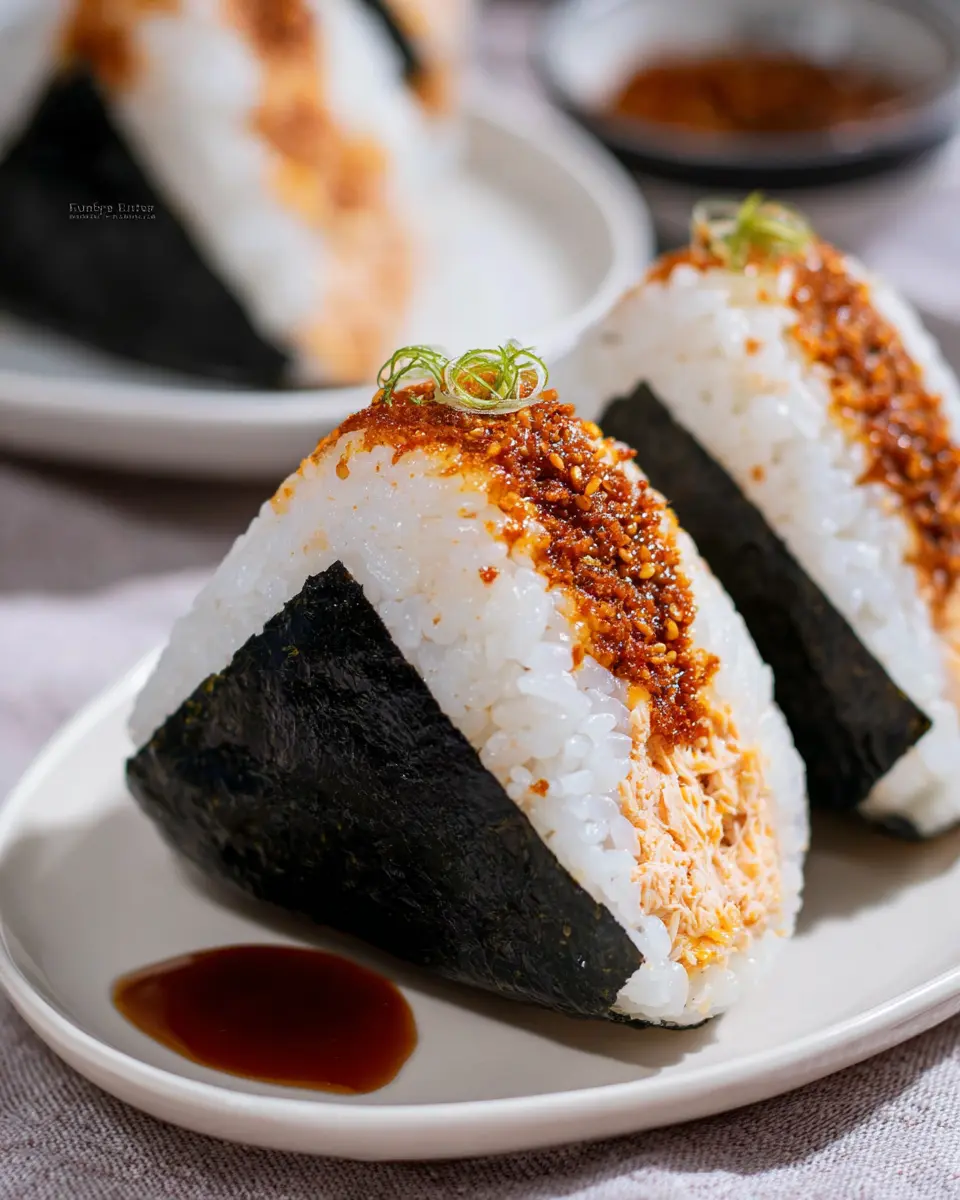
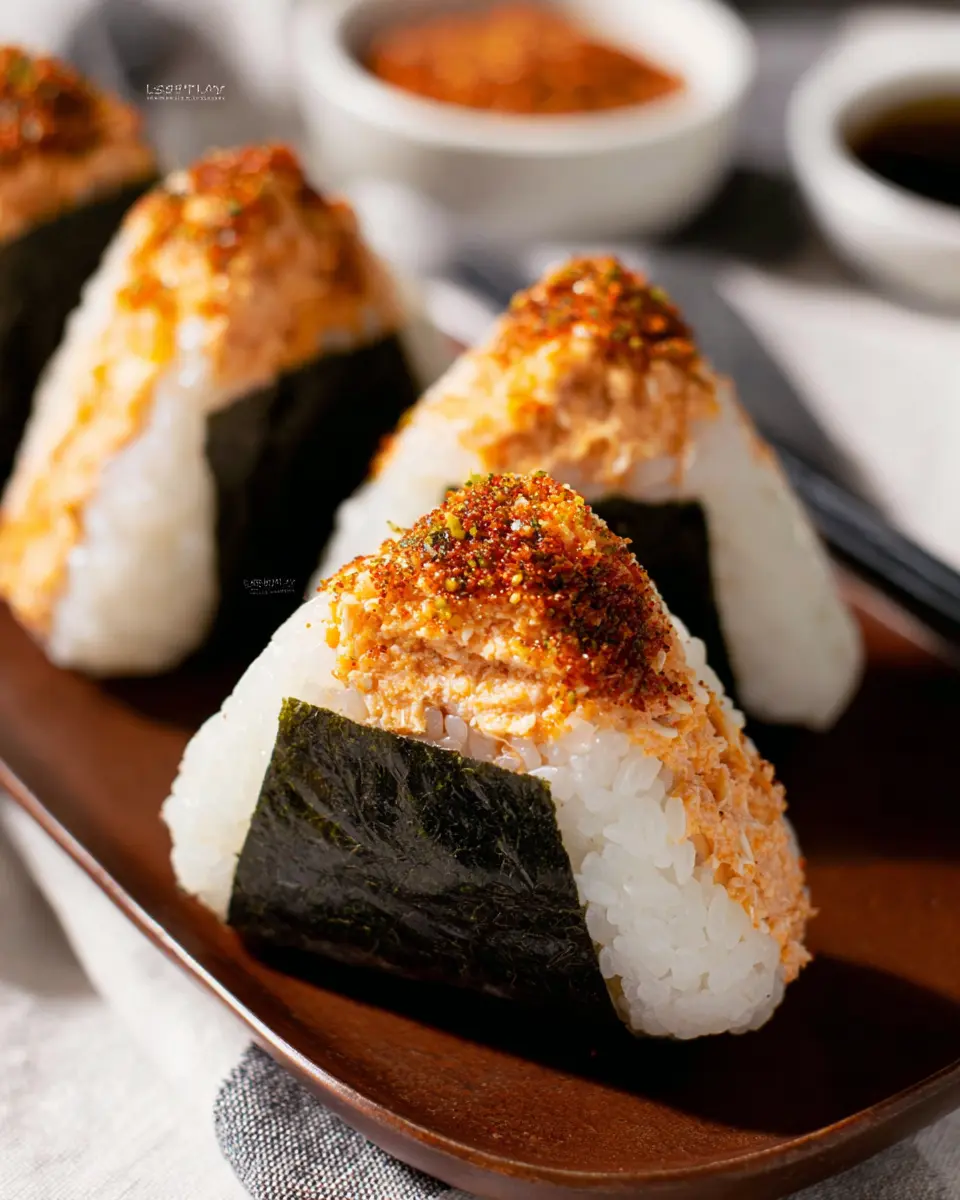
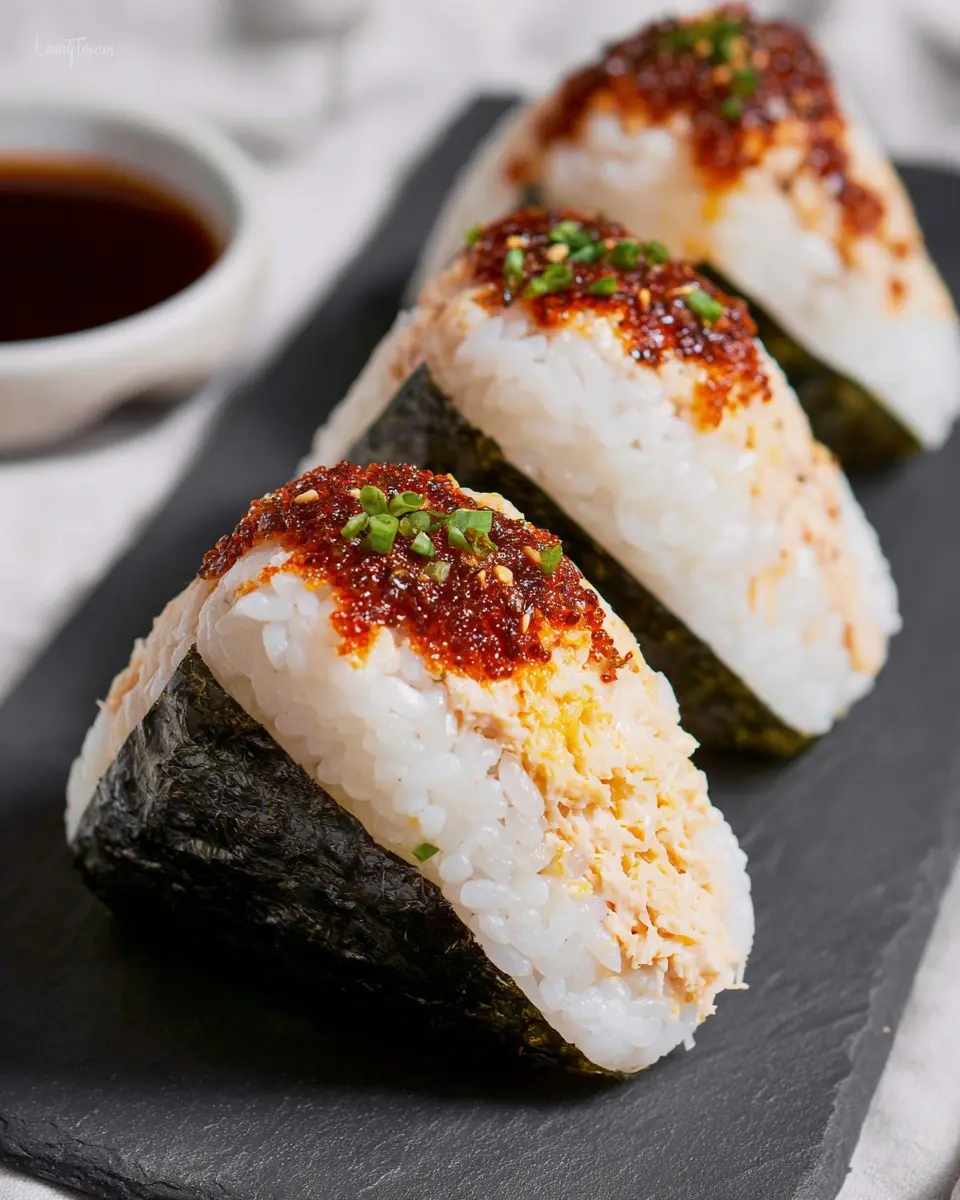
Using an onigiri mold makes the shaping process a breeze! Start with a half sheet of nori, shiny side down. Position the mold at the top edge of the nori, then add enough seasoned rice (about ¼ to ⅓ cup) to the bottom of the mold, spreading it evenly. Fill the center with a tablespoon of your spicy tuna, then top it with another ¼ to ⅓ cup of rice. Firmly press down on the mold to shape your onigiri. When you release the mold, you'll have a perfectly formed rice triangle wrapped in nori—so satisfying!
Forming onigiri without a mold
Don’t worry if you don’t have a mold; you can easily shape your onigiri by hand. Lay a sheet of cling film flat, then spread about ½ to ⅔ cup of your seasoned rice in the center. Add your spicy tuna filling and carefully gather the rice together using the cling film. Twist it to form a ball, gently flatten it into a triangle, and voilà! You have your onigiri, ready for the next step.
Wrapping and finishing off your onigiri
Finally, it’s time to wrap it up! For either method you’ve used, place the onigiri at the center of your nori and fold it over. Ensure the corners stick for a neat finish. If desired, you can cut your onigiri in half, and serve them on a platter for an eye-catching presentation at your next gathering. Enjoy your spicy tuna onigiri—perfect for any occasion!
Feel free to check out more tips and tricks for making rice-based snacks on Just One Cookbook. Happy cooking!
Variations on Spicy Tuna Onigiri
Try Different Proteins for Your Filling
While Spicy Tuna Onigiri is a classic favorite, don’t hesitate to get creative with your protein choice! Substitute tuna with alternatives like shredded chicken breast, delicious turkey bacon, or even spicy crab meat for a unique twist. Vegetarian options, such as marinated tofu or chickpea salad, can also satisfy the taste buds—making it easy to accommodate various dietary preferences.
Add Veggies and Other Spices for Extra Flavor
Enhance your Spicy Tuna Onigiri by layering in some crunchy veggies! Ingredients like sliced cucumbers, avocado, or shredded carrots add fresh flavors and textures. You can also sprinkle in some sesame seeds or a dash of chili flakes for an extra kick. Remember, the magic lies in customizing to fit your palate, so feel free to experiment with different spices and herbs for a personal touch!
Cooking Tips and Notes for Spicy Tuna Onigiri
How to Avoid Sticky Rice
To achieve perfectly fluffy spicy tuna onigiri, start by ensuring your sushi rice is rinsed thoroughly before cooking. This removes excess starch that leads to stickiness. Once cooked, season your rice while it’s still hot, allowing the flavors to meld beautifully. To cool it quickly without compromising texture, spread it out in a large bowl or sheet pan; consider fanning it for that additional help!
Tips for Perfect Seasoning
Seasoning is key for delicious spicy tuna onigiri. Use a mixture of rice vinegar, sugar, and salt—the combination balances sweetness and acidity. Taste the rice while mixing in the seasonings to find that sweet spot for your palate. For an extra burst of flavor, sprinkle on some furikake—a Japanese rice seasoning that adds umami goodness to every bite! Want more tips? Check out this guide for perfect sushi rice preparation!
Serving suggestions for Spicy Tuna Onigiri
Pair with sides for a balanced meal
For a satisfying and balanced meal, why not serve your Spicy Tuna Onigiri with a side of fresh vegetables? Think crisp cucumber slices or a vibrant salad drizzled with sesame dressing. You could also include edamame or miso soup to enhance the umami flavor. These options not only complement the spicy tuna but also add essential nutrients, making your meal more fulfilling.
Creative ways to present your onigiri
Presentation is key when serving Spicy Tuna Onigiri. Consider arranging them on a beautiful platter with decorative garnishes like pickled ginger or shiso leaves. You could even wrap each onigiri in a colorful sushi mat for a more festive look. Another fun idea is to create a bento box, pairing your onigiri with seasonal fruits and a small dessert. This not only makes your meal aesthetically pleasing but also elevates the overall dining experience!
Time breakdown for Spicy Tuna Onigiri
Preparation time
Get ready to dive into this delicious dish! The preparation time for your Spicy Tuna Onigiri is a quick 20 minutes. This includes getting your sushi rice seasoned and mixing up the spicy mayo tuna filling.
Cooking time
Since we’re using cooked sushi rice, there’s no cooking time involved for this recipe. Just grab your pre-cooked rice and you're good to go!
Total time
In total, you’ll need around 20 minutes to whip up these tasty onigiri. Perfect for a snack, a meal on the run, or even to impress guests at your next gathering! For more tips on making the perfect onigiri, check out this insightful article to enhance your skills. Happy cooking!
Nutritional Facts for Spicy Tuna Onigiri
When it comes to nourishing snacks, Spicy Tuna Onigiri is a delightful choice that’s both tasty and satisfying. Let's break down the nutritional profile to help you make informed choices.
Calories
Each onigiri packs about 139 calories, making it a relatively light option for a quick snack or meal replacement.
Protein
You'll find approximately 6.3 grams of protein in each serving. This helps keep you feeling fuller for longer, especially with the addition of light canned tuna in the filling.
Sodium
With around 248.1 mg of sodium, these onigiri are flavor-rich but still moderate in salt content, perfect for those watching their sodium intake while enjoying a savory treat.
For further insights on health-conscious eating, check out Healthline for tips on balanced nutrition!
FAQs about Spicy Tuna Onigiri
Can I make onigiri in advance?
Absolutely! Spicy Tuna Onigiri can be made in advance, making them perfect for meal prep or packed lunches. Just prepare them a few hours ahead and keep them wrapped in a damp cloth to maintain freshness.
What’s the best way to store leftover onigiri?
To store leftover Spicy Tuna Onigiri, place them in an airtight container and keep them in the refrigerator. When you’re ready to enjoy, let them sit at room temperature for a bit to soften the rice. If you plan to keep them for more than a day, consider freezing them in a single layer on a baking sheet before transferring them to a freezer bag.
How can I make onigiri vegetarian-friendly?
Making Spicy Tuna Onigiri vegetarian-friendly is easy! Simply replace the tuna with a mixture of mashed avocado, cucumber, or pickled vegetables. Season with spicy mayo to keep that delicious flavor. You could also try a tofu-based filling for added protein. These swaps provide the same satisfying experience while accommodating different dietary preferences!
Conclusion on Spicy Tuna Onigiri
In summary, Spicy Tuna Onigiri offers a delightful blend of flavor and convenience, making them an excellent choice for busy lifestyles. With simple ingredients and quick preparation, you'll enjoy creating these savory snacks at home. Experiment with fillings and seasonings to make them uniquely yours!
Spicy Tuna Onigiri
Equipment
- rice cooker
- mixing bowl
- Measuring spoons
- Onigiri Wrapper + Mold
Ingredients
Nori
- 4 sheets nori cut in half (or 7 sheets onigiri wrapper)
Seasoned Rice
- 4 cups cooked sushi rice hot and fresh (or medium grain rice)
- 1 tablespoon rice vinegar
- 1 teaspoon granulated sugar
- ½ teaspoon salt preferably fine salt
- 2 tablespoons furikake Japanese rice seasoning (optional)
Spicy Mayo Tuna
- 4 ounces light canned tuna well drained (usually 1 regular can)
- 1½ tablespoons Kewpie mayo
- 1 tablespoon Sriracha more or less to your preference
Instructions
Prepare the Rice and Tuna
- Combine the rice vinegar, sugar, and salt. Mix until dissolved.
- While the sushi rice is hot, season the rice with the prepared rice vinegar and furikake. Fluff well so that the seasonings are evenly dispersed. Cover with a damp towel and set aside to let the rice cool.
- Meanwhile, place the drained canned tuna into a mixing bowl. Add the Kewpie mayo and Sriracha and mix until evenly combined.
Onigiri with Mold
- Place half a sheet of nori, shiny side down, and place the tip of the triangle mold at the center of the top edge of the seaweed. Add enough rice into the mold to cover the bottom, about ¼ to ⅓ cup of rice. Spread the seasoned rice as evenly as possible on the bottom and slightly up the sides of the mold to form a little 'bowl.'
- Place about one tablespoon of the spicy mayo tuna in the center and cover the top with about the same amount of rice as the bottom, about ¼ to ⅓ cup. Spread out the rice if need be, then use the press to firmly and evenly press down the onigiri. Keep the pressure on the press and pull the triangle mold up to release the mold.
- Fold the bottom half of the nori over the onigiri and fold the corners down to adhere. Set aside and repeat with remaining ingredients.
Onigiri without Mold
- Place a sheet of cling film flat on your work surface and spread about ½ cup to ⅔ cup of the seasoned rice at the center of the cling film. Try to keep to be as even as possible and keep the rice about ½ inch thick, but make sure there are no holes.
- Add about 1 tablespoon of the spicy mayo tuna at the center of the rice. Next, using the cling film, bring the rice together and twist the cling wrap to form a ball. Undo the twist and gently flatten the rice ball to about 1 inch thick. Using your hands, shape the flattened rice ball into a triangle.
- Place half a sheet of nori, shiny side down, and place the triangle rice ball at the center of the top half of the seaweed. Fold the bottom half of the nori over the onigiri and fold the corners down to adhere. Set it aside and repeat with remaining ingredients.

Leave a Reply