
Introduction to Homemade Cake Pops
If you haven't yet tried making homemade cake pops, you’re in for a delightful transformation. These bite-sized treats bring all the joy of cake but in a fun, handheld form. They are incredibly versatile and perfect for any occasion—think birthday parties, weddings, or just a cozy night in with friends. With a bit of creativity, you can customize them to match any theme or flavor profile.
Why Homemade Cake Pops Are a Game Changer
One of the biggest advantages of making cake pops at home is the opportunity to control the ingredients. By starting from scratch, you can create a cake that matches your taste precisely—no store-bought mixes or canned frostings here! Plus, making them together can be a fun, shared activity with friends or family.
Did you know that people love these little treats not just for their flavor but also for their presentation? Imagine a platter of beautifully coated cake pops embellished with colorful sprinkles to brighten up any gathering. That combination of creativity and taste is what makes homemade cake pops a true game changer. By following our detailed recipe, you’ll never look back at pre-made ones! For some helpful tips and tricks, check out this informative guide to enhance your cake pop journey.
Ingredients for Homemade Cake Pops
Creating delicious homemade cake pops starts with the right ingredients. Below, you’ll find everything you need to whip up these delightful treats!
Essential Ingredients for the Cake
To make a moist and flavorful cake, gather these essential ingredients:
- All-purpose flour: 1 and ⅔ cups (for structure and texture)
- Unsalted butter: ½ cup, softened (adds richness)
- Granulated sugar: 1 cup (just the right amount of sweetness)
- Egg: 1 large (for moisture and binding)
- Pure vanilla extract: 2 teaspoons (for a lovely flavor boost)
- Whole milk: 1 cup (for a tender crumb)
For a complete guide on measuring your ingredients accurately, check out this helpful resource.
Ingredients for the Frosting
To bring your cake pops together, you’ll need a creamy frosting made from:
- Unsalted butter: 7 tablespoons, softened
- Confectioners’ sugar: 1 and ¾ cups (for that sweet, fluffy finishing touch)
- Heavy cream or whole milk: 2-3 teaspoons (for a smooth consistency)
- Pure vanilla extract: 1 teaspoon (to enhance the flavor)
Tasty Coating Options
Once your cake pops are assembled, it’s time to dip them in a delicious coating! Consider these tasty options:
- Candy melts: 24 ounces (they come in various colors and are super easy to use)
- White chocolate: Chopped bars work beautifully too
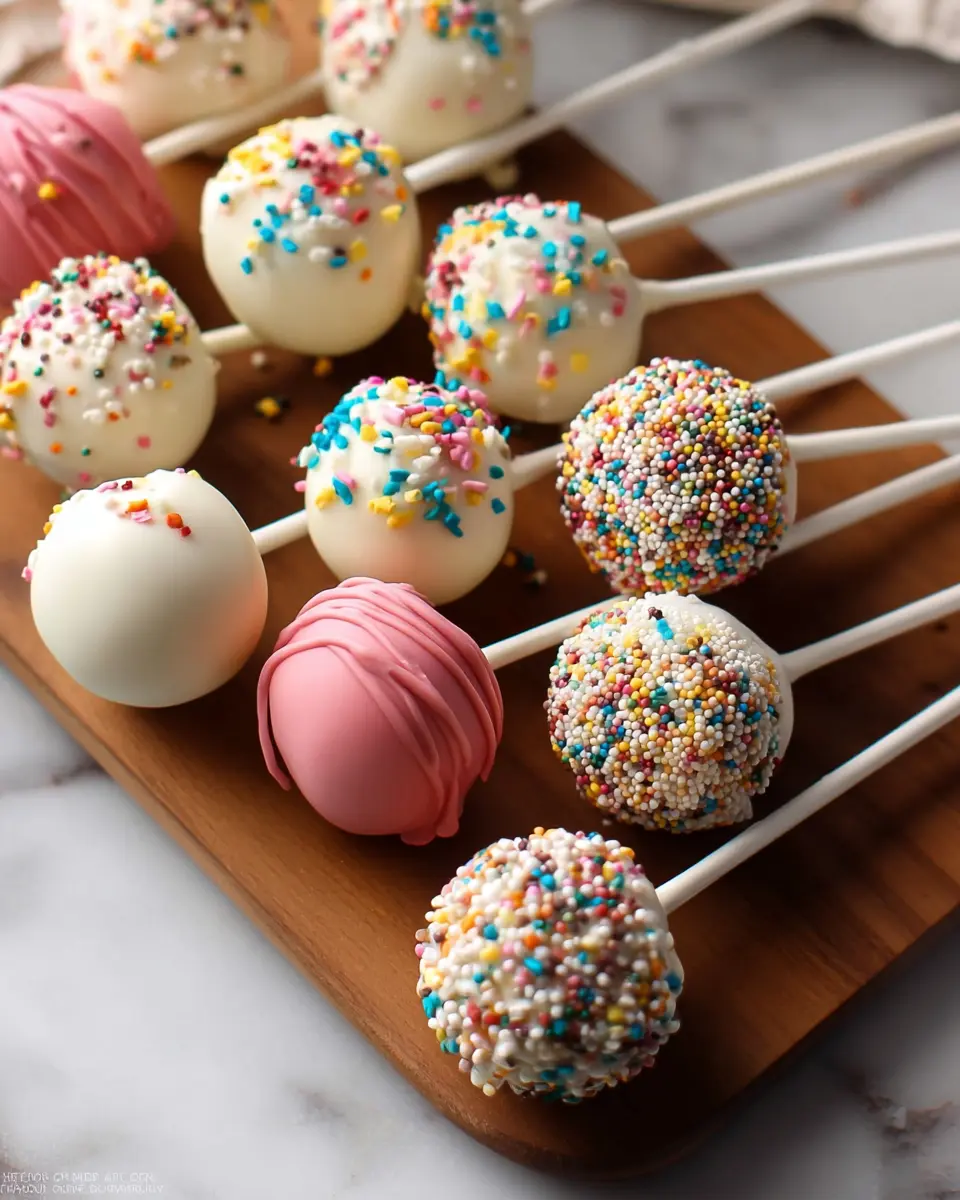
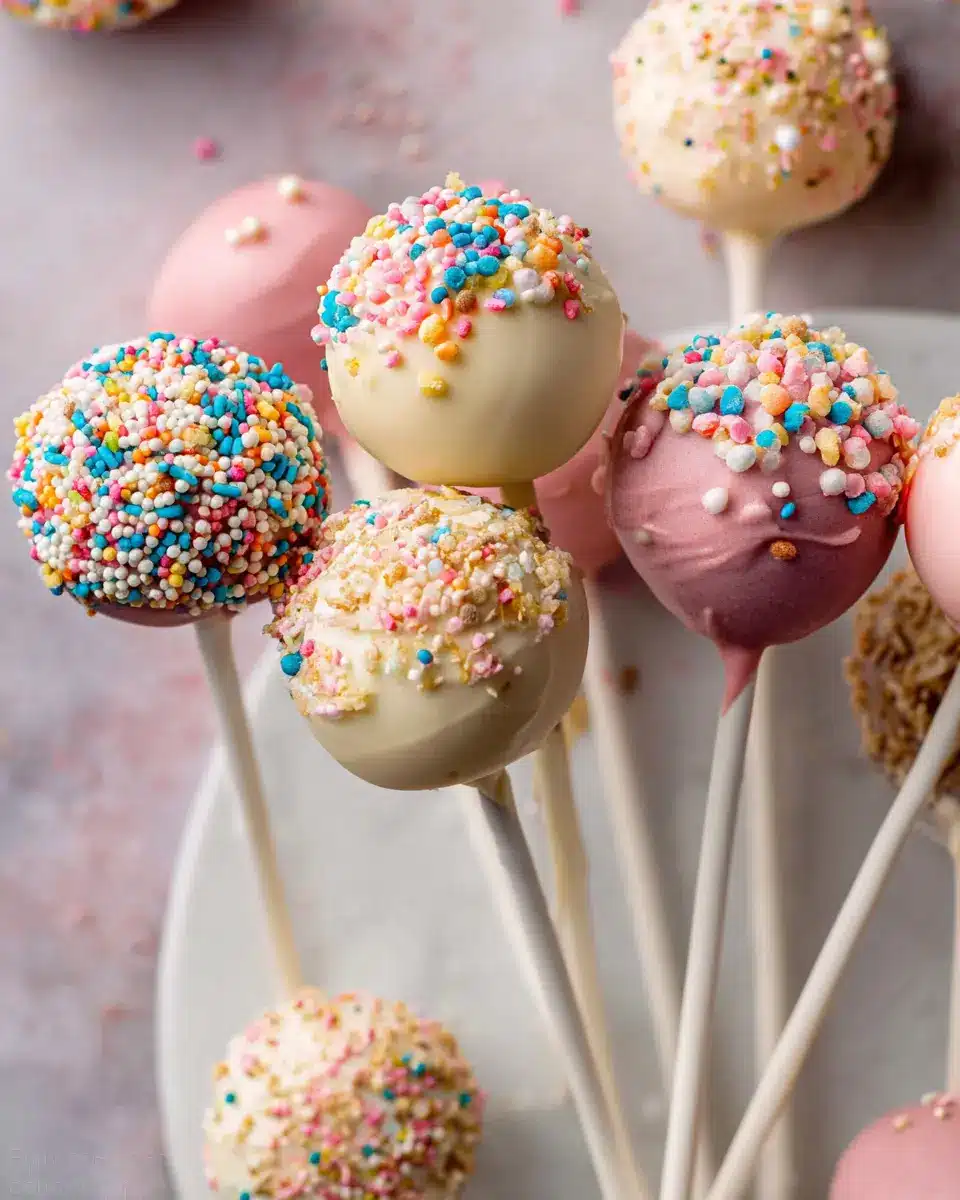
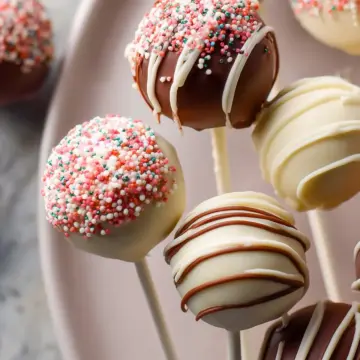
- Sprinkles: Perfect for adding that festive, colorful touch
Experimenting with flavors and textures in your homemade cake pops can lead to some mouthwatering results! Now, let’s get started on crafting these delightful treats!
Preparing Homemade Cake Pops
Creating delightful homemade cake pops is not just a fun kitchen project, but a wonderful way to impress friends and family. With the right preparation and a little creativity, you can transform simple ingredients into delicious and visually appealing treats. Let's dive into how to get the best results!
Prepping Your Kitchen and Tools
Before you begin, it's essential to set the stage. Make sure your kitchen is clean and organized. Gather your tools—this includes:
- Mixing bowls
- A hand or stand mixer
- A baking pan
- A spatula
- A measuring cup
- Parchment paper or a silicone baking mat
Having all these tools readily available will make your baking process a breeze. If you’re a bit unsure about measuring ingredients correctly, check out this helpful guide on how to measure baking ingredients!
Making the Cake from Scratch
Using fresh ingredients will give your homemade cake pops an unbeatable taste. Follow the recipe closely:
- Preheat your oven to 350°F (177°C).
- Mix your dry ingredients—flour, baking powder, baking soda, and salt—in one bowl.
- In another larger bowl, cream your butter and sugar until fluffy. Add the egg and vanilla, then mix until combined.
- Gradually add the dry ingredients along with milk, stirring until everything is well incorporated.
Bake your cake for 30–36 minutes until a toothpick inserted in the center comes out clean. Allow it to cool completely on a wire rack.
Crafting the Delicious Frosting
No cake pop is complete without a rich frosting! In a clean mixing bowl, beat softened butter until creamy, then gradually add confectioners’ sugar and a splash of heavy cream or milk. Finish with a hint of vanilla extract for that divine flavor.
Combining Cake and Frosting
Once your cake has cooled, crumble it into the frosting and mix until well combined. This blend is crucial for the cake pops to hold their shape. Aim for a moist but not overly soggy mixture.
Shaping the Cake Pops
Take small portions of the mixture (about a tablespoon) and roll them into smooth balls. Place them on a lined baking sheet—they may need a quick chill in the fridge for firmness, so they don't fall apart during dipping.
Dipping and Decorating the Pops
In this final step, melt your candy melts or white chocolate. Dip each cake ball by inserting a lollipop stick first to help secure it. Coat it evenly, and let any excess drip off. Feel free to use sprinkles to add a splash of color!
Place the cake pops upright in a foam block or box to set. They’ll be ready to enjoy in about an hour!
With this guide, you're well on your way to mastering homemade cake pops. So gather those ingredients and get baking—your friends will be asking for your secret recipe in no time!

Variations on Homemade Cake Pops
Chocolate Cake Pops
If you're a chocolate lover, try making homemade cake pops using a rich chocolate cake base. Simply substitute cocoa powder for some of the flour in the recipe, and you'll have a decadent treat that's perfect for any celebration. Use dark chocolate melts for a gourmet touch, or opt for milk chocolate for a sweeter experience. The irresistible combination of chocolate cake and a smooth chocolate coating is sure to bring smiles!
Fun Flavor Combinations
Get creative with your homemade cake pops by experimenting with unique flavor combinations. Think lemon cake with white chocolate coating for a refreshing twist or red velvet with cream cheese frosting. You can even add flavored extracts like almond, coconut, or peppermint to the cake batter for an extra layer of deliciousness. The possibilities are endless! For more ideas, check out this cake flavor pairing guide.
Baking and Preparation Notes for Homemade Cake Pops
Tips for Cake Consistency
To achieve the perfect cake pop, focus on the cake’s texture. You want a moist but sturdy cake that holds its shape. When crumbling the cake, ensure there are no large lumps; a fine crumble will yield a smoother finish when mixed with frosting. Refrigerate the balls for a couple of hours to help them firm up before coating. If you find the mixture too dry, consider adding a bit more frosting to enhance moisture.
Best Practices for Coating
Coating is where your homemade cake pops truly shine! Melt your chocolate or candy melts gently—start in the microwave at 20-second intervals to avoid scorching. When dipping, make sure the cake balls are cold for better adherence. After dipping, gently shake off any excess coating for a smoother finish. Don’t forget to sprinkle right away while the coating is still wet to ensure it sticks! If you need inspiration for decoration, check out this great guide on creative designs.
Serving Suggestions for Homemade Cake Pops
Perfect Pairings for Celebrations
Homemade cake pops are the ultimate party treat! Consider serving them alongside:
- Fresh Fruit: Berries or sliced citrus can create a refreshing contrast.
- Ice Cream: Pair your cake pops with scoops of ice cream for a delightful dessert bar.
- Coffee or Tea: Offer a cozy beverage selection to complement the sweet flavors.
These pairings not only enhance your guests' experience but also elevate the festive atmosphere at birthday parties, weddings, or casual gatherings.
Creative Presentation Ideas
Get imaginative with how you display your homemade cake pops! Here are a few suggestions:
- Colorful Stand: Use a decorated foam board or a tiered stand for an eye-catching centerpiece.
- Themed Decorations: Match your cake pops’ decorations to the event theme, like pastel colors for baby showers or vibrant hues for summer parties.
- Personalized Wrapping: Consider individually wrapping cake pops in clear bags tied with ribbons for a charming takeaway treat.
A well-presented cake pop display not only delights the eye but can also spark conversations among your guests! Want more ideas on presentation? Check out this guide for inspiration.
Tips for Making Perfect Homemade Cake Pops
Common pitfalls and how to avoid them
Making homemade cake pops can be a delightful yet tricky endeavor. One common pitfall is using too much frosting, which makes the cake balls overly moist and difficult to coat. Aim for just enough to bind the cake crumbs together. Additionally, if your cake pops start to crack after coating, ensure they are chilled properly before dipping. It’s essential to keep them cold to maintain their shape during the melting process.
How to achieve a smooth coat
A smooth coating is key for gorgeous cake pops. To achieve this, make sure your candy melts or chocolate are perfectly melted—avoid any lumps! Stir frequently while microwaving or using a double boiler. When dipping, swirl the cake pop in the coating to allow excess to drip off, and gently tap the stick against the edge of your bowl to achieve that clean finish. For extra flair, try using a heat gun to slightly melt and smooth out any imperfections on the coating after it sets.
By following these tips, you'll create stunning cake pops that are as delicious as they are beautiful! Want more guidance? Check out resources on Candy Melts or Cake Decorating Techniques for additional insights!
Time Details for Homemade Cake Pops
Preparation Time
Prepare to spend about 2 hours whipping up your delicious homemade cake pops. This includes baking the cake and making the frosting—definitely time well spent!
Chilling Time
After forming your cake balls, they need 2 hours in the refrigerator to chill properly. This ensures they hold their shape during coating.
Total Time
From start to finish, expect a total time commitment of around 7 hours. This might sound like a lot, but most of it is hands-off while your cake cools and your pops chill.
For more baking tips and tricks, check out this guide on cake baking essentials or explore the science behind cake pops on Serious Eats.
Nutritional Information for Homemade Cake Pops
Homemade cake pops are a delightful treat that packs a punch when it comes to flavors. Here’s what to consider for each cake pop:
- Calories: Each cake pop contains approximately 150 calories.
- Sugar Content: With about 10 grams of sugar per pop, they satisfy a sweet tooth without going overboard.
- Protein: You'll find around 2 grams of protein in each pop, making it a fun, albeit light, indulgence.
For a deeper dive into nutritional breakdowns, check out Healthline for more information!
FAQs about Homemade Cake Pops
Can I make cake pops ahead of time?
Absolutely! You can prepare the cake base a day ahead and store it at room temperature. If you want to make the homemade cake pops even further in advance, you can refrigerate the undipped balls for up to 2 days or freeze them for up to 6 weeks. Just make sure to allow them to thaw in the refrigerator before dipping!
What’s the best way to store cake pops?
Once your cake pops are decorated, they can be stored in the refrigerator for up to a week. Use an airtight container to keep them fresh. For longer storage, feel free to freeze the finished cake pops; they last up to 6 weeks in the freezer.
Can I use gluten-free ingredients for cake pops?
Yes, you can easily make gluten-free homemade cake pops! Substitute all-purpose flour with a 1:1 gluten-free baking mix. Just ensure your other ingredients, like baking powder and chocolate, are also gluten-free to keep everything safe for your dietary needs.
Conclusion on Homemade Cake Pops
Making homemade cake pops is a delightful endeavor that brings creativity and joy into your kitchen. The effort is truly worthwhile, as you get to enjoy delicious treats tailored to your taste and decorated in fun styles. Whether for a special occasion or a simple treat, the satisfaction is unmatched.
Homemade Cake Pops
Equipment
- 9-inch springform pan
- handheld or stand mixer
- whisk
- Cooling Rack
- baking sheet
- silicone baking mat or parchment paper
- 2-cup liquid measuring cup
- lollipop sticks
Ingredients
Cake
- 1 and ⅔ cups all-purpose flour spooned & leveled
- ½ teaspoon baking powder
- ¼ teaspoon baking soda
- ½ teaspoon salt
- ½ cup unsalted butter softened to room temperature
- 1 cup granulated sugar
- 1 large egg at room temperature
- 2 teaspoons pure vanilla extract
- 1 cup whole milk (or buttermilk)
Frosting
- 7 tablespoons unsalted butter softened to room temperature
- 1 and ¾ cups confectioners’ sugar
- 2–3 teaspoons heavy cream or whole milk
- 1 teaspoon pure vanilla extract
Coating
- 24 ounces candy melts (or white chocolate bars)
- sprinkles
Instructions
Preparation
- Preheat oven to 350°F (177°C). Grease a 9-inch springform pan.
- Make the cake: Whisk the flour, baking powder, baking soda, and salt together in a medium bowl. Set aside. Using a handheld or stand mixer fitted with a paddle or whisk attachment, beat the butter and sugar together in a large bowl until creamed, about 3 minutes. Add the egg and vanilla extract and beat on high speed until combined. Scrape down the bottom and sides of the bowl as needed.
- Add the dry ingredients and milk to the bowl with the wet ingredients and mix on low speed until combined. Pour and spread the batter evenly into the prepared pan. Bake for 30–36 minutes or until a toothpick inserted in the center comes out clean.
- Allow the cake to cool completely in the pan set on a wire rack.
- Make the frosting: Beat the butter on medium speed until creamy, about 2 minutes. Add confectioners’ sugar, heavy cream, and vanilla extract and mix to combine. Increase to high speed and beat for 3 full minutes.
- Crumble the cooled cake into the bowl on top of the frosting. Turn the mixer on low speed and beat until combined.
- Scoop 1 Tablespoon (about 20g) of cake/frosting mixture and roll into a ball. Place on a lined baking sheet. Refrigerate for 2 hours, or freeze for 1 hour to set the shape.
- Melt the chocolate or candy melts in a 2-cup liquid measuring cup in 20-second increments until melted and smooth.
- Coat the cake balls: Dip the end of a lollipop stick into the coating, then insert into the center of the cake ball. Dip the cake ball into the coating until completely covered and gently tap the stick against the edge to allow excess coating to drip off.
- Decorate with sprinkles and place upright into a styrofoam block or box. Repeat with remaining cake balls.
- Coating will set within an hour. Store cake pops in the refrigerator for up to 1 week.

Leave a Reply